
If you want to control how bright your lights are, a dimmer switch is the answer. But dimmer switch wiring can feel confusing if you have never done it before. This guide breaks everything down in simple steps, so anyone, even a complete beginner, can understand how it works, what the wires mean, and how to wire a dimmer switch safely at home.
What Is a Dimmer Switch and Why Does Wiring Matter?
A dimmer switch lets you turn your lights up or down instead of just on or off. This saves electricity and makes your room feel more comfortable. But the wiring behind it is a little different from a regular light switch, so it is important to get it right.
Getting the wiring wrong can damage your lights, trip your breaker, or even cause a fire. That is why understanding electrical wiring for a dimmer switch matters so much before you start.
Dimmer Switch Wiring Color Code You Must Know
Before touching any wires, you need to know what each color means. This is called the dimmer switch wiring color code, and it changes depending on where you live.
In the United States:
- Black = Hot (live wire that carries power)
- White = Neutral (returns power back)
- Green or Bare Copper = Ground (safety wire)
- Red = Traveler wire (used in 3-way setups)
In the UK:
- Brown = Live
- Blue = Neutral
- Green/Yellow = Earth (Ground)
- Grey or Black = Switched live (used in older installations)
Knowing these colors helps you connect the right wires to the right terminals every single time.
How to Install a Dimmer Switch With Two Wires
Many older homes only have two wires going to the switch. Here is how to install a dimmer switch with two wires safely:
What you need:
- Flathead and Phillips screwdriver
- Wire stripper
- Voltage tester
- New dimmer switch (single pole)
Step-by-step:
- Turn off the breaker that controls that light
- Use a voltage tester to make sure there is no power
- Remove the old switch cover and unscrew the switch
- Pull the switch out gently and look at the wires
- You will see two black wires (or one black and one white)
- Connect each wire to one of the two terminals on your new dimmer
- If there is a green wire on the dimmer, connect it to your ground wire or screw
- Push everything back into the box and screw it in
- Put the cover back and turn the breaker on
- Test your dimmer to make sure it works
That is all there is to wiring a dimmer switch in a basic single-pole setup. Call a licensed electrician if unsure
1-Way Dimmer Switch Wiring Diagram Explained
A 1-way wiring set-up diagram shows one switch controlling one light from one location. This is the most common setup in bedrooms and living rooms.
In this setup:
- The live wire comes in and connects to the input terminal of the dimmer
- The output terminal connects to the light
- The neutral wire goes straight to the light fixture
- The ground wire connects to the ground terminal on the dimmer
This is called a single-pole dimmer switch setup. It is simple and straightforward. If you only have one switch for one light, this is your setup.
Dimmer Switch Wiring Diagram: L1 and L2 Explained
You may see the labels L1 and L2 on your dimmer switch terminals. This is common in the UK and some other countries.
Here is what they mean:
- C (Common): This is where the live wire connects. Power comes in here.
- L1: This goes to the light. It is the switched live output.
- L2: This is used in a 2-way switch setup. It connects to the other switch.
So a dimmer switch wire diagram, L1 and L2, shows you that C gets the live wire, L1 goes to the lamp, and L2 connects to a second switch if you have two switches controlling one light.
If you only have one switch (1-way), you only use C and L1. L2 stays empty.
3-Wire Dimmer Switch Wiring Diagram
Some dimmer switches come with three wires already attached. This is common with Lutron and Leviton dimmers. A 3-wire dimmer switch setup diagram looks like this:
- Black wire from the dimmer = Connects to the hot/live wire in your wall
- White wire from the dimmer = Connects to the neutral wire OR goes to the light (depends on the brand)
- Green wire from the dimmer is ground.
Always check the instructions that come with your specific dimmer. Lutron and Leviton dimmer switch wiring both follow this pattern but may label things slightly differently on their diagrams.
3-Way Dimmer Switch Wiring Explained
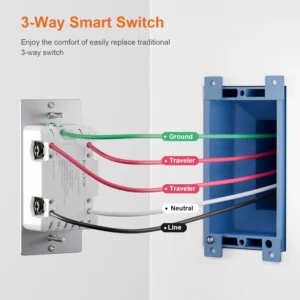
A 3-way dimmer switch wiring setup means two switches control one light. You might have this at the top and bottom of your stairs.
Here is how it works:
- One switch is the dimmer
- The other switch is a regular 3-way switch (not another dimmer, usually)
- They are connected by two traveler wires (usually red and black)
- The common wire at each switch carries the main power
In a 3-way dimmer switch wiring diagram:
- The dimmer gets the black (hot) wire and two traveler wires
- The second switch also gets two traveler wires and a common wire going to the light
- Both switches share the same travelers
Lutron 3-way wiring dimmers and Leviton 3-way setups follow this same plan. Always check if your dimmer is rated for 3-way use before buying.
How to Wire a Dimmer for LED Bulbs
LED bulbs need a special dimmer. A regular old dimmer made for incandescent bulbs may flicker or buzz with LED lights.
An LED dimmer switch wiring diagram looks the same as a regular dimmer diagram. The wiring does not change. What changes is the type of dimmer you buy. Make sure your dimmer says it is compatible with LED bulbs on the box.
Also, LED dimmers often require a minimum load to work properly. If you only have one LED bulb on the circuit, it may flicker. Check the dimmer’s minimum wattage rating before installing.
Dimmer Switch vs Regular Switch Wiring: What Is Different?
People often ask about dimmer switch vs. regular switch wiring. Here is the simple answer:
A regular switch just breaks the circuit to turn the light off. A dimmer switch controls how much electricity flows through, so it needs more terminal connections and sometimes a neutral wire.
The main difference:
- Regular switch = 2 terminals (just breaks the circuit)
- Dimmer switch = May have 2, 3, or 4 wires/terminals depending on the type
- Some dimmers need a neutral wire; regular switches usually do not
So no, a dimmer switch is not always wired exactly the same as a normal switch, especially in newer smart dimmer models.
Common Dimmer Switch Wiring Mistakes to Avoid
Here are some mistakes people make that you should watch out for:
- Not turning off the breaker before starting
- Mixing up the L1 and L2 terminals in a 2-way setup
- Using an old dimmer with LED bulbs (causes flickering)
- Forgetting to connect the ground wire
- Installing two dimmers on a 3-way circuit (usually only one dimmer is allowed)
- Overloading the dimmer beyond its wattage rating
Conclusion
Dimmer switch wiring is not as hard as it looks once you understand the color codes, terminal labels, and what each wire does. Whether you are doing a single-pole electrical setup, a 3-way electrical setup, or installing an LED dimmer switch, the steps are simple when broken down clearly. Always turn off the power first, match your wire colors correctly, and check that your dimmer is rated for the bulbs you are using. Following the right electrical setup diagram for your specific setup makes the whole job much easier and safer.
With brands like Lutron and Leviton making quality dimmers that come with clear instructions, even a first-timer can handle electrical wiring for a dimmer switch with confidence. Take your time, double-check every connection, and your dimmer will work perfectly for years to come.
Read our other informative blogs at Mediazon
FAQs
Q1: How should a dimmer switch be wired? Connect the hot (live) wire to the input terminal and the output terminal to the light. Add a ground wire if available. For 3-way setups, use traveler wires between both switches.
Q2: What are L1, L2, and C on a dimmer switch? C is the common (live input), L1 is the output to the light, and L2 is used in 2-way switching to connect a second switch.
Q3: What are the 4 wires on a dimmer switch? Usually: black (hot), white (neutral or to light), red (traveler for 3-way), and green (ground). Always check the diagram included with your dimmer.
Q4: Is a dimmer switch wired the same as a normal switch? Not always. Basic dimmers are similar, but many modern dimmers need a neutral wire and have more terminals than a standard on/off switch.
Q5: Can I use any dimmer switch with LED bulbs? No. You need an LED-compatible dimmer. Using an old dimmer with LED bulbs can cause flickering, buzzing, or early bulb failure.